


Hi,
I receive requests on how to feed car telemetry data into LapTimer for non OBD II cars - or newly developed accessories - regularly. While feeding in data using the Custom OBD WiFi sensor is available for quite a while, enhancements getting available in v19 apps will make it pretty easy to accomplish this task using Arduinos and other platforms.
This post will give details, links and other background information on how to add "3rd party" data to LapTimer et al.
ELM327 "Language"
Any custom OBD like source needs to talk "ELM327". ELM327 is a so called "ad hoc" standard introduced years ago by ELM Electronics - a Canadian company. The protocol has been introduce to have a (somewhat) human readable language to talk with the car. There are other languages used by today's OBD adapter manufacturers and LapTimer et al support a few of them too. But as written above, custom sources ELM327 is the only option currently. While ELM327 is not optimized for efficient communication (it comes with quite some overhead - a tight request / reply pattern in particular), it is a very well documented language available on the net: http://elmelectronics.com/DSheets/ELM327DS.pdf
High Level View
But before taking about languages and protocols, what is the general architecture used to get OBD data into the app? Lets start with the communication level. There are several connection technologies available today - each coming with pros and cons. The technologies used most frequently are WiFi and Bluetooth. Bluetooth is coming in two flavors - anything up to BT3.0 (I call it "standard BT" here) and BT4.0 featuring Bluetooth Low Energy (BTLE). I have made a detailed discussion on this technologies available here, so please check in case you want more information on the characteristics. To frame the discussion, at the time of writing, LapTimer et al support WiFi and standard BT on Android, and WiFi and BTLE on iOS for custom integrations.
Once a connection is made (details below), there are two "streams" established between the app and the adapter. One to allow the app to talk to the adapter, and one to allow the adapter to talk to the app. A stream is an IT concept allowing to send data (in our case - using the ELM327 language, we actually send strings) from a talker to a listener.
The next level of architecture is "talking" using this streams. When using ELM, the general pattern is the app sends a request (using the stream) to the adapter naming what it wants. As an example, a request may look like "01 05\r" - meaning the app requests a parameter 05 (engine coolant temperature) from the adapter. What happens is the adapter receives this request and deals with the car's bus what the current value is. Once this value gets available, it sends it back to the app using the ELM327 reply pattern "41 05 7B\r". The "7B" is actually the data for engine coolant temperature in degrees Celsius. "7B" is hexadecimal and converts to 123 in decimal, i.e. 123 degree Celsius. Parameters like 01 05 are defined in the OBD II standard and are available on Wikipedia. Once the app receives this reply, it will decode it, and store the value in its database. All of this is an extremely simplified description, but should give you the idea. For more information on this item, please check the section "Talking to the Vehicle" in the ELM327 pdf linked above.
Custom Options
So what are the options to use all of this using a custom solution? The trick is to establish a processing platform that is available to the app by one of the above connection technologies, makes sensor data available from actual sensors, interprets incoming requests, and answers with sensor data read. This platform can be some micro controller based solution like built into most OBD II dongles, or a Arduino board connecting some analog or digital channels wired into your car. As sample for a solution like this is OBD2 4U (which is not actively developed any more).
Configuring Communication
All of Harry's apps starting with v19 will come with a set of Expert Settings similar to those shown below. Our free GPS/OBD Buddy includes all of this options starting with 18.9.2. It is the best platform to develop your solution, as it does not only provide everything you need, but has complete logging enabled for debugging.
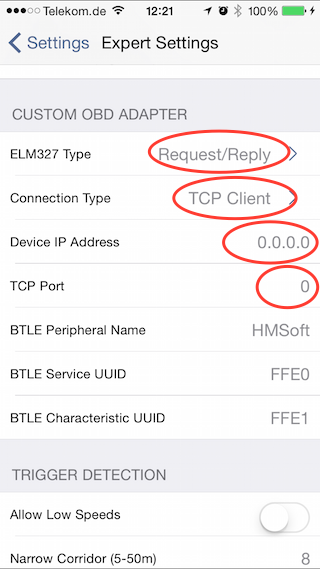
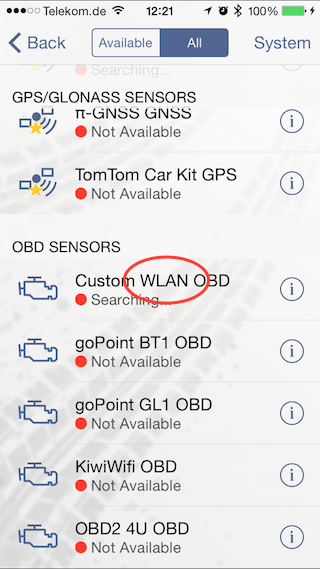
Using WiFi as connection technology: to use WiFi, your platform needs to have an IP address the app can communicate to and it needs to habe a TCP socket listening to a certain port. It is recommended to use your own combination (i.e. not those of well known solutions like OBDLink MX WiFi or the Kiwis) to not generate conflicts during testing. The snapshots below show the relevant fields. Top down, for WiFi these are "ELM327 Type" specifying the standard request / reply pattern described above, a connection type not further detailed here, the named IP address and TCP port mentioned above ("Device IP Address" and "TCP Port". The sensor list will show up like in the second snapshot.
Using BT LE as communication technology: completely new starting with v19, this allows you to use e.g. an Arduino board featuring a BT LE module. Accessing the BT LE streams depend on the Arduino solution used, but will basically built stream on top of a well known BT LE characteristic. The sample below uses a programmable Freematics OBD dongle (not recommended in general from my side, but the platform I used for testing).
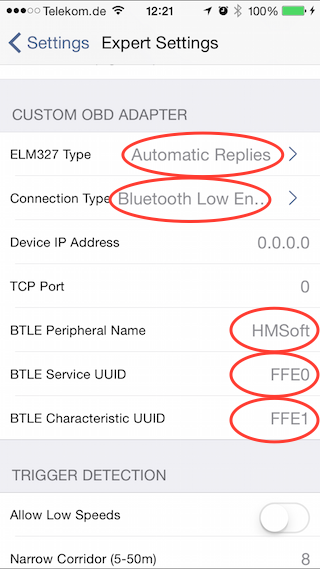
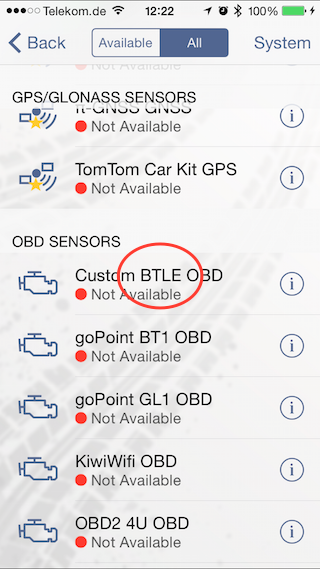
When using BT LE, you need to specify the device's name, the service UUID and the characteristic UUID used for the stream. By switching the "Connection Type" to Bluetooth Low Energy, LapTimer et al will remove the WiFi custom sensor and replace it by a BTLE type (as seen in the second snapshot).
Make Communication Easy
From what I have seen, it is a quite time intensive effort to implement the full request / reply pattern for ELM327. Especially when using BT LE - which comes with low bandwidth and relevant latency, it it probably better to use the simple "Automatic Replies" ELM327 Type show in the BT LE sample. What does it mean? When having automatic replies set, the app will not request anything but will simply sit there and wait for data coming in. So instead of sending 0105, waiting for 4105xx, checking if this is what has been requested, sending the next request, you simple send 41xxxx "replies" once you have any data available. You actually simply stream data one-way.
NB: LapTimer requires some criteria to finish a complete set of PIDs coming in. It uses the RPM PID (010C) by default. This means whenever 410Cxx is coming in, LapTimer will consider this the last PID in a set of values sent and close the current fix and store it. In case the terminating RPM PID is missing, LapTimer will not store data or show a valid update rate.
To understand the approach and give an Arduino sample Sketch, this is how to send sensor data. The SoftwareSerial part will differ for other boards.
Code: Select all
#include <SoftwareSerial.h>

SoftwareSerial SerialBT(A2, A3);

void setup()
{
  SerialBT.begin (9600);
}

int         currentAutoReplyIndex = 0;
const char  *autoReplies [] = {
  "411001BA\r\r>",  //  Some MAF value
  "410C5DC0\r\r>",  //  6000 rpm (x4 according to PID definition)
  "4111FF\r\r>",    //  Full throttle
  "410DC8\r\r>"     //  200 km/h wheel speed
};
int         numAutoReplies = sizeof (autoReplies)/sizeof(char *);

void loop()
{
  SerialBT.write (autoReplies [currentAutoReplyIndex%numAutoReplies%numAutoReplies]);
  currentAutoReplyIndex++;
}The above code delivers an effective OBD rate of 25 Hz by the way - meaning 100 PIDs are transferred per second. So as long as the one way communication is used, BT LE will not be the bottleneck.
PIDs supported
Please find below a list of PIDs LapTimer et al "understand" currently. Do not send anything else - it will be ignored. Not discussed in depth in this article, the third column shows the frequency at which LapTimer will request PIDs. It makes no sense to poll parameters changing infrequently too often. A value of 1/16 means the parameter is requested only every 16th loop, while 1/1 means it is requested for each loop through parameters available. Furthermore, parameters not delivered by the car at all, will not be requested.
Code: Select all
DTCCNT                  01 01        1/16
VIN                     09 02        once
OBDSUP                  01 1C        once
FuelLevel               01 2F        1/16
CoolantTemperature      01 05        1/16
OilTemperature          01 5C        1/16
IntakeAirTemperature    01 0F        1/16
CatTemperature          01 3C        1/16
MAF                     01 10        1/4
RPM                     01 0C        1/1
Throttle                01 11        1/1
MAP                     01 0B        1/1
Speed                   01 0D        1/1
Other Options
Arduino / Rasberry based solutions are probably straight forward and the most common approach to implement custom solution today. Especially the WiFi option - which can even use the Internet as transportation layer, allows sophisticated client / server solutions too.
I hope this is a good starting point for any custom solution you want to attach to LapTimer, Buddy, and the upcoming Heavy Duty line of apps. In case you have questions, please feel free to post here.
- Harry


